Finding the vehicle
My first step was to find at least one of the
vehicles from the brief nearby. I practised plane modelling last
summer so I knew I would enjoy modelling the WW1 Bristol fighter. I
searched the internet for war museums and aero parks until I found
the fighter at the Imperial War Museum in Duxford. I called them to
ensure it was in an appropriate position for photographing (not
suspended from beams like some), and that it could get reference from
all angles.
I want to keep this option as a backup as choosing
the fighter would mean travelling, paying and only having one main
opportunity to get all of the reference I need. I want to know that
the vehicle I choose will be close enough for me to visit whenever I
need to.
Meanwhile I was asking around and emailing people
about a 3 wheeler Piaggio I had seen around the village. After a few
days I had an owners address. Unfortunately the car was in a garage
and wasn’t available for another 4 days so I downloaded blueprints
and started modelling.
Research and Preparation
I also
used the time to do some research which included other vehicles
modelled with the same budgets, all the 3D Piaggios I could find and
just some inspirational 3D cars with realistic materials and good
flow lines to refer to.
Reference
Photos
Unfortunately
it turns out the blueprints I have been using are quite different to
the vehicle so I have to change it. Bit of time lost.
Problems
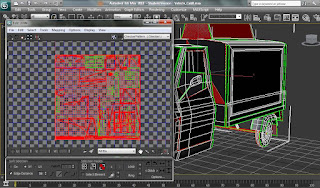 My
first major problem occurred when I was trying to select the
different ID materials separately. I couldn’t figure it out and was
sure there would be an easy way. But I couldn’t find it so I
resorted to detaching half of the vehicle and having it as a separate
object so I could open the map in the material editor without seeing
both maps.
My
first major problem occurred when I was trying to select the
different ID materials separately. I couldn’t figure it out and was
sure there would be an easy way. But I couldn’t find it so I
resorted to detaching half of the vehicle and having it as a separate
object so I could open the map in the material editor without seeing
both maps.
For
a while I thought this was working until I applies the STL check
modifier. Shock horror! Every seem I had detached was,
well...detached and I had ton weld them all together.
And
then I found these. -_-
I
have been determined to master the Ambient Occlusion since the trash
project. I realise the simple set of instruction in the tutorial
shouldn’t be difficult to follow, but for some reason it just never
worked. However, as soon as i was happy with the vehicle mesh, I wanted some nice renders to show for it...Behold.
And
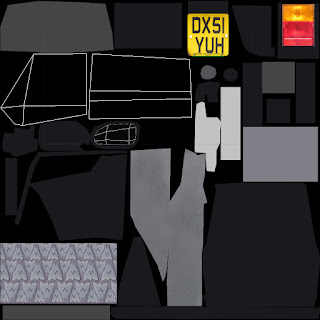
then came the texturing problems.
I
really wanted to master texturing with this project. I didn’t want
to just use a specular map to create the cars paint so I started
finding tutorials on material properties and creating a light studio
designed to compliment vehicle textures.
The dull ammature texturing I need to avoid.
This is my studio. My lights and reflective surfaces are set up and I import it into the scene with my vehicle to test the rendering.
I
The
car material has been my ongoing problem through out this project. I
am still tweaking it every time I work on the vehicle.
My
less than efficient unwrapping of the model has also become a
problem. I have unwrapped it again to see if texturing will then
become easier and more effective.


 My
first major problem occurred when I was trying to select the
different ID materials separately. I couldn’t figure it out and was
sure there would be an easy way. But I couldn’t find it so I
resorted to detaching half of the vehicle and having it as a separate
object so I could open the map in the material editor without seeing
both maps.
My
first major problem occurred when I was trying to select the
different ID materials separately. I couldn’t figure it out and was
sure there would be an easy way. But I couldn’t find it so I
resorted to detaching half of the vehicle and having it as a separate
object so I could open the map in the material editor without seeing
both maps.


